The Desktop is Dead! Long live the Desktop!

So it seems like desktop applications are dead, or the were… I don’t know. I’d rather a full native app instead of a web-based app. EVERYWHERE! And that includes desktop apps. Electron.js based apps are fast to develop, easy to maintain, and cross platform, but they s*ck$. They are hungry for resources, CPU and memory, as they are based on the always-hungry (Chrome) browser.

So, a few solutions come to scene in the last few years. The most famous I believe it’s Flutter, it covers mobile and desktop, but also web. But it’s not the only one! JetBrains released Compose for Desktop, which targets macOS, Linux and Windows. It’s a port of Android’s Compose for Desktop, what makes this a great alternative for multiplatform apps. If we add Kotlin Multiplatform to this equation for creating Business Logic that can also run on iOS, Kotlin seems like a great starting point for fully native desktop and mobile apps.

Web-based multiplatfom solutions are hungry for resources. Native apps are more resource-efficient, load faster, work better in offline mode.

Similar to the previous article, I will explore the development process of a Linux app using Kotlin Compose, and also will run that app on macOS. Take into consideration that Kotlin Compose is yet an experimental feature.

System Requirements

The only requirement for developing apps using Compose for Desktop, is Kotlin 1.4.20 or newer. A Java Runtime Environment is of course required for this JVM language, and even Kotlin can run on JRE 7 (for example) it’s recommended to use an as new as possible Java Virtual Machine, for example JVM 11 or 13.

At the time of this post there is a bug in JDK 14 that doesn’t allow to generate a Debian package in Linux. If you are using Linux, please switch to either JDK 11 (LTS) or JDK 15.

IntelliJ IDE, made by JetBrains, supports creating Kotlin Compose apps out-of-the-box. Two flavours are available:

  • Desktop
  • Multiplatform

Desktop targets macOS, Linux and Windows using Compose, while Multiplatform adds Android support.

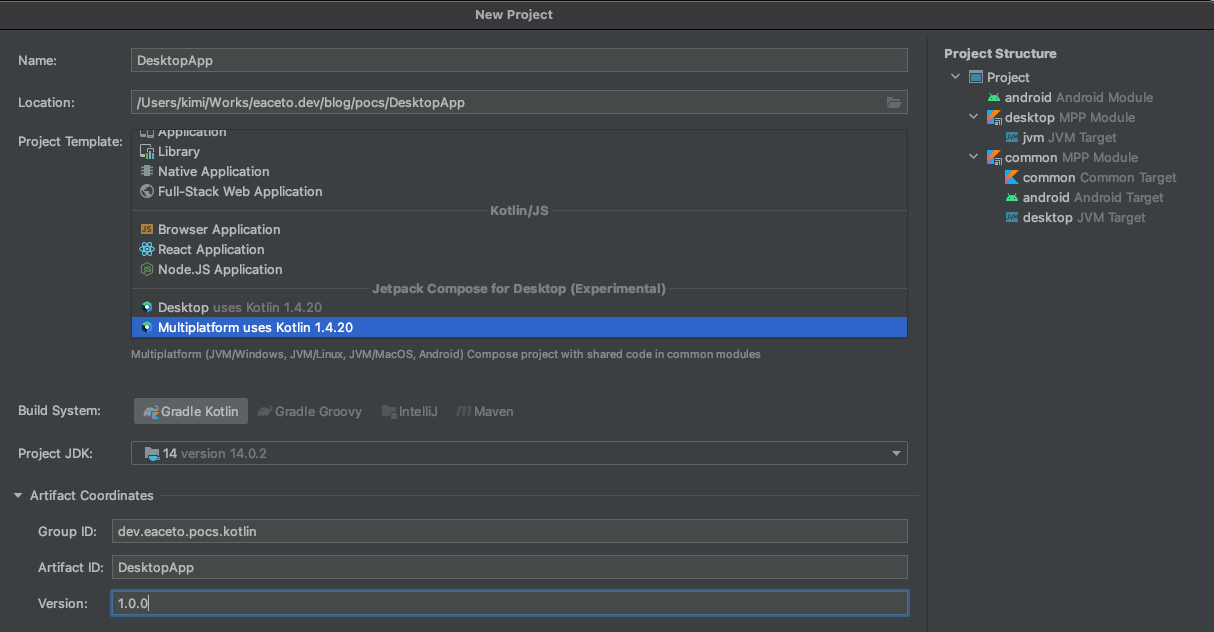
In this tutorial, a desktop-only app will be created.

Getting Started

When the IDE finished starting up the project, all dependencies are downloaded and the index is updates, a single Main.kt file will be present in your source folder. The entry point of the app is a main function that returns a Window.

A simple Compose app may look like

@ExperimentalAnimationApi
fun main() = Window(title = "Hello, Compose!") {
    MaterialTheme {
        Column(
            horizontalAlignment = Alignment.CenterHorizontally,
            verticalArrangement = Arrangement.Center,
            modifier = Modifier.padding(32.dp).fillMaxWidth().fillMaxHeight()
        ) {
            Card {
                var expanded by remember { mutableStateOf(false) }
                Column(
                    horizontalAlignment = Alignment.CenterHorizontally,
                    verticalArrangement = Arrangement.Center,
                    modifier = Modifier.clickable { expanded = !expanded }) {
                    Image(
                        bitmap = imageResource("drawable/kotlin.png"),
                        alignment = Alignment.Center,
                        modifier = Modifier.padding(32.dp).preferredWidth(128.dp).preferredHeight(128.dp)
                    )
                    AnimatedVisibility(expanded) {
                        Column {
                            Text(
                                text = "Hello, Compose!",
                                style = MaterialTheme.typography.h2
                            )
                        }
                    }
                }
            }
        }
    }
}
Native Kotlin Compose app running on macOS

Distribution

Packaging an application can be a little tricky, you can run the app everywhere using a gradle o maven task, but you can only create a package, a distributable installation file, in the same architecture of the target package. In other words, there is no “cross packaging”. You cannot create a Debian compatible -deb- file from macOS. So, in order to cover all the available flavours, you will need access to Windows, macOS and Debian.

Which, if you have a macOS machine, it’s pretty easy to archive using VirtualBox or any other Virtual Machine.

The package task generates a distributable file for the current platform. There are other related tasks, but I couldn’t successfully run any of the on a platform different that the current on.

$ ./gradlew package

> Task :packageDmg
WARNING: Using incubator modules: jdk.incubator.jpackage
The distribution is written to build/compose/binaries/main/dmg/DesktopApp-1.0.0.dmg

BUILD SUCCESSFUL in 11s
5 actionable tasks: 3 executed, 2 up-to-date
  • msi (Microsoft Installer) for Windows
  • deb (Debian package) for Debian/Ubuntu compatible
  • dmg (Disk Image File) for macOS
Inside generated DMG file

Artefacts

The very simple app that you see in this post needs 80MB of disk space, and generates a DMG file of nearly 42MB. Where only 1MB belongs to this application (assets and compiled code). The rest is just Kotlin libraries (coroutines, stdlib, material design, etc).

/Applications/DesktopApp.app/Contents/app
kimi@Kimis-Mac-mini /A/D/C/app> ls -la
total 37024
drwxr-xr-x  38 kimi  admin     1216 Mar 23 14:34 ./
drwxr-xr-x   8 kimi  admin      256 Mar 23 14:34 ../
-rw-r--r--   1 kimi  admin   104427 Mar 23 14:34 DesktopApp-1.0.0.jar
-rw-r--r--   1 kimi  admin     1522 Mar 23 14:34 DesktopApp.cfg
drwxr-xr-x   3 kimi  admin       96 Mar 23 14:34 META-INF/
-rw-r--r--   1 kimi  admin     1522 Mar 23 14:34 MainKt$main$1$1$1$1$1$1.class
-rw-r--r--   1 kimi  admin     9533 Mar 23 14:34 MainKt$main$1$1$1$1$2$1.class
-rw-r--r--   1 kimi  admin    15698 Mar 23 14:34 MainKt$main$1$1$1$1.class
-rw-r--r--   1 kimi  admin     9692 Mar 23 14:34 MainKt$main$1$1.class
-rw-r--r--   1 kimi  admin     2157 Mar 23 14:34 MainKt$main$1.class
-rw-r--r--   1 kimi  admin     1292 Mar 23 14:34 MainKt.class
-rw-r--r--   1 kimi  admin   208635 Mar 23 14:34 animation-core-desktop-0.2.0-build132.jar
-rw-r--r--   1 kimi  admin   201364 Mar 23 14:34 animation-desktop-0.2.0-build132.jar
-rw-r--r--   1 kimi  admin    17536 Mar 23 14:34 annotations-13.0.jar
-rw-r--r--   1 kimi  admin    15414 Mar 23 14:34 desktop-jvm-0.2.0-build132.jar
drwxr-xr-x   4 kimi  admin      128 Mar 23 14:34 drawable/
-rw-r--r--   1 kimi  admin   822462 Mar 23 14:34 foundation-desktop-0.2.0-build132.jar
-rw-r--r--   1 kimi  admin   357370 Mar 23 14:34 foundation-layout-desktop-0.2.0-build132.jar
-rw-r--r--   1 kimi  admin  1488745 Mar 23 14:34 kotlin-stdlib-1.4.20.jar
-rw-r--r--   1 kimi  admin   191485 Mar 23 14:34 kotlin-stdlib-common-1.4.20.jar
-rw-r--r--   1 kimi  admin    22355 Mar 23 14:34 kotlin-stdlib-jdk7-1.4.20.jar
-rw-r--r--   1 kimi  admin    16233 Mar 23 14:34 kotlin-stdlib-jdk8-1.4.20.jar
-rw-r--r--   1 kimi  admin   196243 Mar 23 14:34 kotlinx-collections-immutable-jvm-0.3.jar
-rw-r--r--   1 kimi  admin  1672388 Mar 23 14:34 kotlinx-coroutines-core-jvm-1.4.1.jar
-rw-r--r--   1 kimi  admin    10884 Mar 23 14:34 kotlinx-coroutines-swing-1.4.1.jar
-rw-r--r--   1 kimi  admin  1261868 Mar 23 14:34 material-desktop-0.2.0-build132.jar
-rw-r--r--   1 kimi  admin   674505 Mar 23 14:34 material-icons-core-desktop-0.2.0-build132.jar
-rw-r--r--   1 kimi  admin   584609 Mar 23 14:34 runtime-desktop-0.2.0-build132.jar
-rw-r--r--   1 kimi  admin    19435 Mar 23 14:34 runtime-dispatch-desktop-0.2.0-build132.jar
-rw-r--r--   1 kimi  admin    56960 Mar 23 14:34 runtime-saved-instance-state-desktop-0.2.0-build132.jar
-rw-r--r--   1 kimi  admin   248772 Mar 23 14:34 skiko-jvm-0.1.18.jar
-rw-r--r--   1 kimi  admin  8553451 Mar 23 14:34 skiko-jvm-runtime-macos-x64-0.1.18.jar
-rw-r--r--   1 kimi  admin  1378337 Mar 23 14:34 ui-desktop-0.2.0-build132.jar
-rw-r--r--   1 kimi  admin    38650 Mar 23 14:34 ui-geometry-desktop-0.2.0-build132.jar
-rw-r--r--   1 kimi  admin   304483 Mar 23 14:34 ui-graphics-desktop-0.2.0-build132.jar
-rw-r--r--   1 kimi  admin   311880 Mar 23 14:34 ui-text-desktop-0.2.0-build132.jar
-rw-r--r--   1 kimi  admin    81156 Mar 23 14:34 ui-unit-desktop-0.2.0-build132.jar
-rw-r--r--   1 kimi  admin    11744 Mar 23 14:34 ui-util-desktop-0.2.0-build132.jar

It may seems to much, but, remember that this application embeds a Java Runtime and a lot of libraries that make your live easier developing in Kotlin.

In comparison to Electron.js + React.js I believe that the artefact size is similar, but there is a huge improvement in running a Kotlin / JVM app.

Ubuntu

Getting Started with Flutter for Linux

This post will not cover how to install Flutter on Linux, that can be easily done reading the following official guide. Instead, it will focus on building a Flutter app that runs on (Ubuntu) Linux.

Adding your Linux machine as a device

By default Flutter expects that you connect an Android or iOS device, or even a Chrome web browser to run the app. But in this case we would like to have a full-native Linux experience.

Flutter may report that you don’t have any connected device

$ flutter devices
No devices detected.

Run "flutter emulators" to list and start any available device emulators.

So in order to create and run a Flutter Linux app, not only the application must we created with Linux as a platform, but also we have to tell Flutter to enable Linux Desktop support.

$ flutter config --enable-linux-desktop
Setting "enable-linux-desktop" value to "true".

You may need to restart any open editors for them to read new settings.

If you are using a version of Flutter prior to 2.x, and upgrade is necessary at this point (flutter upgrade). Running Flutter doctor can tell us if there is something missing. A common situation in a fresh installed device may look like

$ flutter doctor
Doctor summary (to see all details, run flutter doctor -v):
[✓] Flutter (Channel beta, 2.0.0, on Linux, locale en_US.UTF-8)
[✓] Android toolchain - develop for Android devices (Android SDK version 30.0.3)
[✓] Chrome - develop for the web
[✗] Linux toolchain - develop for Linux desktop
    ✗ clang++ is required for Linux development.
      It is likely available from your distribution (e.g.: apt install clang), or can be downloaded from https://releases.llvm.org/
    ✗ CMake is required for Linux development.
      It is likely available from your distribution (e.g.: apt install cmake), or can be downloaded from https://cmake.org/download/
    ✗ ninja is required for Linux development.
      It is likely available from your distribution (e.g.: apt install ninja-build), or can be downloaded from https://github.com/ninja-build/ninja/releases
    ✗ GTK 3.0 development libraries are required for Linux development.
      They are likely available from your distribution (e.g.: apt install libgtk-3-dev)
    ✗ The blkid development library is required for Linux development.
      It is likely available from your distribution (e.g.: apt install libblkid-dev)
    ✗ The lzma development library is required for Linux development.
      It is likely available from your distribution (e.g.: apt install liblzma-dev)
[✓] Android Studio
[✓] IntelliJ IDEA Ultimate Edition (version 2020.3)
[✓] Connected device (2 available)

! Doctor found issues in 1 category.

Install all the necessary dependencies until Flutter doctor returns an output with all items checked, like this

$ flutter doctor
Doctor summary (to see all details, run flutter doctor -v):
[✓] Flutter (Channel beta, 2.0.0, on Linux, locale en_US.UTF-8)
[✓] Android toolchain - develop for Android devices (Android SDK version 30.0.3)
[✓] Chrome - develop for the web
[✓] Linux toolchain - develop for Linux desktop
[✓] Android Studio
[✓] IntelliJ IDEA Ultimate Edition (version 2020.3)
[✓] Connected device (2 available)

• No issues found!

Now, with Flutter telling everything is okey, and the linux desktop support enabled, we can query which devices are enabled

$ flutter devices
2 connected devices:

Linux (desktop) • linux  • linux-x64      • Linux
Chrome (web)    • chrome • web-javascript • Google Chrome 88.0.4324.182

Creating the app

By default Flutter creates an app with several targets as default: iOS, Android, Windows, Linux, macOS and Web. In this brief tutorial, we will only create an app with Linux as the unique target.

$ flutter create --platforms=linux --template=app hello_linux

Flutter create can receive a list of platforms when creating an app, in this example only Linux will be created.

Using the template argument, we can create applications, modules, a Dart package, or a plugin (iOS and/or Android).

Running the application can be doing using flutter run command from the application’s directory. We can specify the target device, using the device-id argument as follows

$ flutter run -d linux

The output of the command above is especially important in order to archive an agile development. It contains not only the URL of the debugger, but also some shortcuts that let’s you use Hot Reload and Hot Restart on this native app.

$ flutter run -d linux
Launching lib/main.dart on Linux in debug mode...
Building Linux application...                                           

** (hello_linux:23299): WARNING **: 17:23:44.883: Failed to set up Flutter locales
Syncing files to device Linux...                                    62ms

Flutter run key commands.
r Hot reload.
R Hot restart.
h Repeat this help message.
d Detach (terminate "flutter run" but leave application running).
c Clear the screen
q Quit (terminate the application on the device).
An Observatory debugger and profiler on Linux is available at: http://127.0.0.1:45697/9m8BapQhQeM=/

Flutter DevTools, a Flutter debugger and profiler, on Linux is available at: http://127.0.0.1:9102?uri=http%3A%2F%2F127.0.0.1%3A45697%2F9m8BapQhQeM%3D%2F

Development Environment

A recommend configuration for a Linux App Development is using Visual Studio Code with the Flutter plugin. On Ubuntu that can be installed using Snap.

$ snap install --classic code
$ code --install-extension dart-code.flutter

Bonus Track

Null Safety

When nullable safety is enabled types cannot be null be default. We have to explicitly say that they can be null.

The first benefit is that it prevents Null Pointer Exceptions (NPE) by throwing errors at compile-time instead of runtime. This is a huge improvement not only in stability but also in code quality.

For learning more about how Dart implements null safety, take a look at this post.

Null safety means that variables can’t contain null unless you say they can

Enabling null safety is done using dart migrate.

$ dart migrate --apply-changes

Headless Raspberry Pi configuration

Settings up a Raspberry Pi it’s easy when you have an HDMI display, a USB keyboard and mouse in oder to access the terminal or you favourite Desktop, but can be quite a challenge when you don’t have any of these or at least no keyboard.

Everything in this blog post should be done from you host computer, with you microSD card connected and mounted, assuming the microSD is mounted at /Volumes/boot.

cd /Volumes/boot
Raspberry Pi 4 with Hyperpixel 4.0 display

Enable SSH over LAN / WiFi

The SSH server is not enable by default as a user it’s expected that you access your Raspberry using a KVM. Not a Linux Kernel but a Keyboard, (VGA) Display and Mouse. This can be easily done by creating an empty file named ssh.

touch ssh

Preconfigured a WiFi network

If you are going to connect to Raspberry to your network using an Ethernet cable, you can skip this part. But if a WiFi network (even your mobile phone as a hotspot) it’s you only option, you can set your default WiFi network config in a file called wpa_supplicant.conf

sudo vi wpa_supplicant.conf
network={
    ssid="<< your WiFi's SSID >>"
    psk="<< your WiFi's password >>"
}

Take into consideration that this configuration uses your password in plain-text! If you want to encrypt your password in this configuration file do the following:

wpa_passphrase "<< your WiFi's SSID >>" "<< your WiFi's password >>"

On a Linux distribution wpa_passphrase is installed, but on macOS or Windows not. the following Ruby script will use OpenSSL in order to create the content of the configuration file.

vi /tmp/raspi_wifi.rb
require 'openssl'
ssid = '<< your WiFi SSID >>'
psk  = 'ID >>" "<< your WiFi password >>'
puts 'country=AR'
puts 'ctrl_interface=DIR=/var/run/wpa_supplicant GROUP=netdev'
puts 'update_config=1'
puts ''
puts 'network={'
puts '  ssid="' + ssid + '"'
puts '  psk=' + OpenSSL::PKCS5.pbkdf2_hmac_sha1(psk, ssid, 4096, 32).unpack("H*").first
puts '  key_mgmt=WPA-PSK'
puts '}'

Then run the script and copy the output to /Volumes/boot/etc/wpa_supplicant/wpa_supplicant.conf

ruby /tmp/raspi_wifi.rb > /Volumes/boot/wpa_supplicant.conf

Accessing your Pi using SSH

Now when your Raspberry completes its boot process, you will be able to access your device using SSH even without knowing its IP address.

Raspberry exposes a host in your local domain, so the following command with let you know it IP address.

ping raspberrypi.local

The default Raspberry user and password are pi and raspberry, so the following command will establish a SSH connection

ssh pi@raspberry.local 
beaglebone-black

BeagleBone Black and Linux Kernel 3.8 with Android support

Building Kernel 3.8 (with Device Tree)

cd ~/
git clone git://github.com/RobertCNelson/linux-dev.git
cd linux-dev/
git checkout origin/am33x-v3.8 -b tmp
./build_kernel.sh

If ./build_kernel.sh fails with ‘undefined references’ to some functions in files like ‘menubox.c’ try running: sudo apt-get install libncurses5 libncurses5-dev libelf-dev libncurses5 libncursesw5-dev and then retry with ./build_kernel.sh.

Setting up Kernel 3.8.x for Android

Once in the Kernel Configuration Utility (kConfig) scroll down, and enter, ‘Device Drivers’.

Beaglebone Black - Kernel Config for AndroidMake sure the ‘Staging drivers’ are enabled, or enable them (an asterisk will appear between brackets)

Beaglebone Black - Kernel Config for Android

Then, enter ‘Staging drivers’ -> ‘Android’. Enable all Android drivers. I recommend you to include them into the kernel, and not build them as module.

Beaglebone Black - Kernel Config for Android

Exit ‘kConfig’ and the Kernel will begin building.

Beaglebone Black - Kernel Config for Android

When it is done you will see something like

Beaglebone Black - Kernel Config for Android

Next: U-Boot for BeagleBone Black

Installing busybox (for Android) on BeagleBoard

Busybox

BusyBox provides several stripped-dowUnix tools in a single executable file. It runs in a variety of POSIX environments such as Linux, and Android. Some of these tools are

  • ssty
  • su
  • gzip
  • ping
  • netstat
  • tar
  • arp
  • wc
  • microcom

Why is busybox necessary on a BeagleBoard running Android?

The default Android build does not have many useful tools like stty, so there it is where this swiss army knife comes to rescue.

Installing busybox

  1. Download ‘busybox’ from http://benno.id.au/android/busybox
  2. Connect to the board using ADB. ./adb shell
  3. Create a busybox directory inside data. mkdir /data/busybox
  4. Exit ADB. exit
  5. Push the downloaded file to the board. ./adb push busybox /data/busybox/busybox
  6. Enter Shell again. ./adb shell
  7. And change permission in order to let any app execute busybox. chmod 777 /data/busybox/busybox
beaglebone-black

Beagleboard xM & native FTDI VCP driver

Adding the driver to the Kernel

cd ~/rowboat-android/kernel
make ARCH=arm CROSS_COMPILE=arm-eabi- distclean
make ARCH=arm CROSS_COMPILE=arm-eabi- omap3_beagle_android_defconfig

Up to this point everything goes as normal. Now let’s add the FTDI support as a driver (NOT as a module). FTDI published a very detailed tutorial that can be found at http://www.ftdichip.com/Support/Documents/TechnicalNotes/TN_132_Adding_FTDI_Devices_VCP_Driver_Support_to_Android.pdf.
make ARCH=arm CROSS_COMPILE=arm-eabi- menuconfig
If ‘menuconfig’ is not present in the host (Ubuntu), install it using the following code:
sudo aptitude install lib32ncurses5-dev
As the documentation presented by FTDI says, it is necessary to enable a few things:

  1. “Device Drivers” -> “USB Support” -> pres ‘y’ over “Support for Host-side USB”
  2. “Device Drivers” -> “USB Support” -> “USB Serial Converter support” -> press ‘y’ over “FTDI Single Port Serial Driver”


Now save this configuration and build the Kernel using
make ARCH=arm CROSS_COMPILE=arm-eabi- -j4
When connecting a FTDI device to the BB xM with this modified Kernel, you will see a ttyUSBx directory inside /dev.

Connecting the FTDI device to the Beagleboard

First of all it will be very useful to connect the Beagleboard Serial port to the host machine and establish a connection using Minicom (or something like that). Once you got there it will be very easy to see if the driver was properly included, and the device is recognized.
See the following screenshot. It shows the device console before the FTDI converter was connected and after that. The device was recognized perfectly, and ttyUSB0 was created under /dev.


A simple test from shell

If you have busybox on Android you can make a simple test in order to see if the driver is well configured (In case you don’t have busybox, you can follow my post on how to install busybox on BeagleBoard).

  1. Connect RX and TX on the FTDI IC
  2. Connect to board using ADB. ./adb shell
  3. Setup ttyUSB0. /data/busybox/busybox stty -F /dev/ttyUSB0 115200
  4. Open microcom (similar to minicom) /data/busybox/busybox microcom -s 115200 /dev/ttyUSB0
  5. Write something and it will be echoed. If you disconnect the RX and TX, what you send it will not be echoed.


Writing to ttyUSB from C

Init the ttyUSB interface

system("/data/busybox/busybox stty -F /dev/ttyUSB0 115200");
The ttyUSB interface can also be initiated from /init.rc file at the end of “on boot” section.

Getting a File Descriptor

FILE * usbdev = fopen("/dev/ttyUSB0", "rw+");

Read and Write from the File Descriptor

char message[20]; /* buffer of data to send */
char rMessage[20]; /* receive buffer */
fwrite(message, sizeof(char), 8, usbdev);
fread(rMessage, sizeof(char), 8, usbdev);

Closing the File Descriptor

fclose(usbdev);

Writing to ttyUSB from Java

Connecting to ttyUSB from Java requires a little bit of extra work. By default, a device under “dev” has permissions only for root. And if your Java app it is not running with root (or your base board is not rooted) you have to change permissions to ttyUSB0 in order to let other apps to write and read from the file (using JNI, of course).
This can be done using several methods, for example:
chmod 777 /dev/ttyUSB0