-
Shadowing Lottie

Lottie is a powerful library that parses After Effects animations and makes mobile (and web) apps more user friendly, enhancing them with beautiful animations and interactions.It’s common for Android projects to fail during build due to incompatible versions of Lottie, or any other library, used by different dependencies.
Developers often resort to solutions such as:
configurations.all {
    resolutionStrategy {
        force("com.airbnb.android:lottie:your-desired-version")
    }
}
Or removing transitive dependencies
implementation("your.library:dependency") {
    exclude(group = "com.airbnb.android", module = "lottie")
}
However, these solutions can lead to runtime issues, including crashes.
Using a resolution strategy that forces a version in a conflict can lead to runtime error.
A more robust way to handle this issue is through Dependency Shadowing.
Dependency Shadowing involves taking a dependency and renaming its package to avoid conflicts.
You might think about forking the repository and changing the package name, but there’s a more efficient approach that doesn’t require maintaining a fork.There is a well-known Java plugin that does this shadowing but doesn’t work quite well will Android projects. So in order to have a better experience in Android development, a Gradle plugin should be created.
Dependency Shadowing
Gradle comes to our rescue
We’ll create a Gradle plugin that enables us to easily shadow dependencies like this:
add("shadowAARImplementation", "com.airbnb.android:lottie:6.1.0")
Here, shadowAARImplementation is a configuration that processes the dependency, shadows it, and adds it to your project. In order to create our plugin. let’s create a buildSrc folder inside your Android project, and inside the folder a structure like the one showed below.
The content of the AddShadowedAARDependenciesPlugin.kt can be found at my public gist.
And the content of the build.gradle.kts file is
plugins {
    `kotlin-dsl`
}

repositories {
    gradlePluginPortal()
}

dependencies {
    implementation("com.github.johnrengelman:shadow:8.1.1")     // https://github.com/GradleUp/shadow
}
Using the AddShadowedARRDependencies Plugin
In your project’s build.gradle.kts file add the import to the plugin
import com.eaceto.android.plugins.shadow.AddShadowedAARDependenciesPlugin
import com.eaceto.android.plugins.shadow.AddShadowedAARDependenciesPluginExtension
Then in the dependencies block add your dependency with
add("shadowAARImplementation", "com.airbnb.android:lottie:6.1.0")Once that is done, add a configuration block in order to rename the package of (Lottie) dependency, with a custom one. I will use for this example com.eaceto.shadowed.lottie
extensions.getByType(AddShadowedAARDependenciesPluginExtension::class.java).apply {
    relocations.set(
        mutableListOf(
            listOf("com.airbnb.lottie", "com.my.package.shadow.lottie"),
        ),
    )
}
If you sync & build your Android project you will find a lot of error related to missing com.airbnb.lottie. This is because now you will find all the Lottie classes under com.eaceto.shadowed.lottie.
Adopting Lottie Compose
The above solution works great for Lottie and other libraries but the GradleUp/Shadow plugin has a few problems with top-level functions. The Lottie-Compose package is full of these functions, so the workaround is:
- Copy all the Lottie Compose functions to a package in your code
- Modify the imports to match the shadowed package
- Add @SuppressLint(“RestrictedApi”) where needed
-
The Desktop is Dead! Long live the Desktop!

So it seems like desktop applications are dead, or the were… I don’t know. I’d rather a full native app instead of a web-based app. EVERYWHERE! And that includes desktop apps. Electron.js based apps are fast to develop, easy to maintain, and cross platform, but they s*ck$. They are hungry for resources, CPU and memory, as they are based on the always-hungry (Chrome) browser.

So, a few solutions come to scene in the last few years. The most famous I believe it’s Flutter, it covers mobile and desktop, but also web. But it’s not the only one! JetBrains released Compose for Desktop, which targets macOS, Linux and Windows. It’s a port of Android’s Compose for Desktop, what makes this a great alternative for multiplatform apps. If we add Kotlin Multiplatform to this equation for creating Business Logic that can also run on iOS, Kotlin seems like a great starting point for fully native desktop and mobile apps.
Web-based multiplatfom solutions are hungry for resources. Native apps are more resource-efficient, load faster, work better in offline mode.
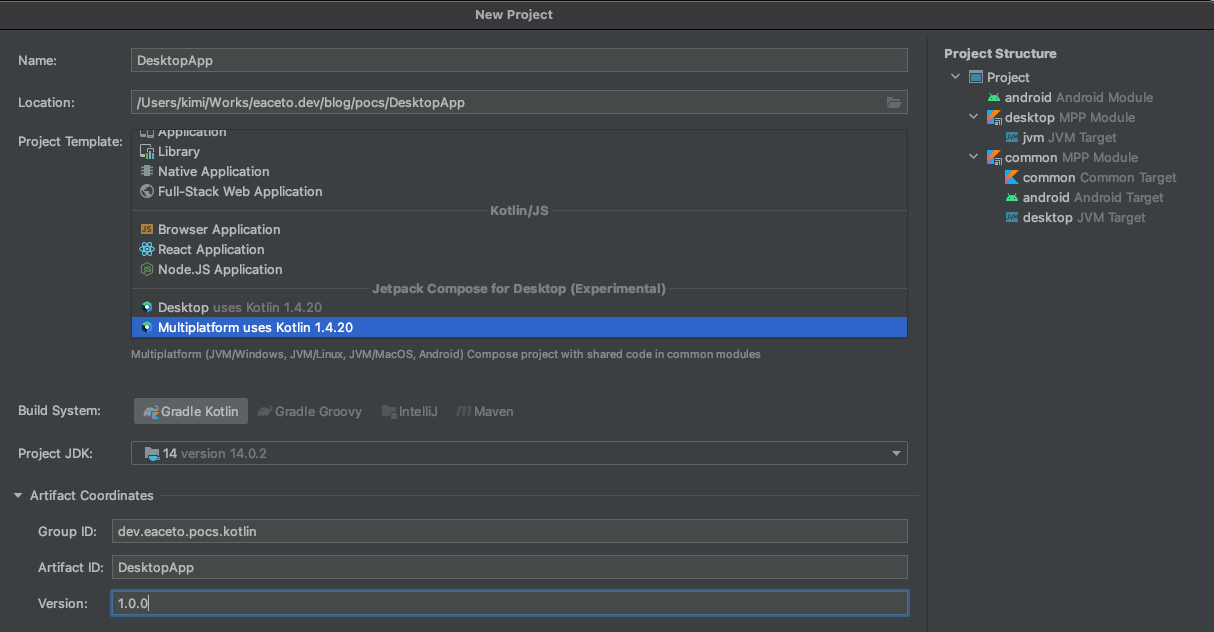
Similar to the previous article, I will explore the development process of a Linux app using Kotlin Compose, and also will run that app on macOS. Take into consideration that Kotlin Compose is yet an experimental feature.
System Requirements
The only requirement for developing apps using Compose for Desktop, is Kotlin 1.4.20 or newer. A Java Runtime Environment is of course required for this JVM language, and even Kotlin can run on JRE 7 (for example) it’s recommended to use an as new as possible Java Virtual Machine, for example JVM 11 or 13.
At the time of this post there is a bug in JDK 14 that doesn’t allow to generate a Debian package in Linux. If you are using Linux, please switch to either JDK 11 (LTS) or JDK 15.
IntelliJ IDE, made by JetBrains, supports creating Kotlin Compose apps out-of-the-box. Two flavours are available:
- Desktop
- Multiplatform
Desktop targets macOS, Linux and Windows using Compose, while Multiplatform adds Android support.


In this tutorial, a desktop-only app will be created.
Getting Started
When the IDE finished starting up the project, all dependencies are downloaded and the index is updates, a single Main.kt file will be present in your source folder. The entry point of the app is a main function that returns a Window.
A simple Compose app may look like
@ExperimentalAnimationApi
fun main() = Window(title = "Hello, Compose!") {
    MaterialTheme {
        Column(
            horizontalAlignment = Alignment.CenterHorizontally,
            verticalArrangement = Arrangement.Center,
            modifier = Modifier.padding(32.dp).fillMaxWidth().fillMaxHeight()
        ) {
            Card {
                var expanded by remember { mutableStateOf(false) }
                Column(
                    horizontalAlignment = Alignment.CenterHorizontally,
                    verticalArrangement = Arrangement.Center,
                    modifier = Modifier.clickable { expanded = !expanded }) {
                    Image(
                        bitmap = imageResource("drawable/kotlin.png"),
                        alignment = Alignment.Center,
                        modifier = Modifier.padding(32.dp).preferredWidth(128.dp).preferredHeight(128.dp)
                    )
                    AnimatedVisibility(expanded) {
                        Column {
                            Text(
                                text = "Hello, Compose!",
                                style = MaterialTheme.typography.h2
                            )
                        }
                    }
                }
            }
        }
    }
}
Native Kotlin Compose app running on macOS Distribution
Packaging an application can be a little tricky, you can run the app everywhere using a gradle o maven task, but you can only create a package, a distributable installation file, in the same architecture of the target package. In other words, there is no “cross packaging”. You cannot create a Debian compatible -deb- file from macOS. So, in order to cover all the available flavours, you will need access to Windows, macOS and Debian.
Which, if you have a macOS machine, it’s pretty easy to archive using VirtualBox or any other Virtual Machine.
The package task generates a distributable file for the current platform. There are other related tasks, but I couldn’t successfully run any of the on a platform different that the current on.
$ ./gradlew package > Task :packageDmg WARNING: Using incubator modules: jdk.incubator.jpackage The distribution is written to build/compose/binaries/main/dmg/DesktopApp-1.0.0.dmg BUILD SUCCESSFUL in 11s 5 actionable tasks: 3 executed, 2 up-to-date- msi (Microsoft Installer) for Windows
- deb (Debian package) for Debian/Ubuntu compatible
- dmg (Disk Image File) for macOS

Inside generated DMG file Artefacts
The very simple app that you see in this post needs 80MB of disk space, and generates a DMG file of nearly 42MB. Where only 1MB belongs to this application (assets and compiled code). The rest is just Kotlin libraries (coroutines, stdlib, material design, etc).
/Applications/DesktopApp.app/Contents/app
kimi@Kimis-Mac-mini /A/D/C/app> ls -la
total 37024
drwxr-xr-x  38 kimi  admin     1216 Mar 23 14:34 ./
drwxr-xr-x   8 kimi  admin      256 Mar 23 14:34 ../
-rw-r--r--   1 kimi  admin   104427 Mar 23 14:34 DesktopApp-1.0.0.jar
-rw-r--r--   1 kimi  admin     1522 Mar 23 14:34 DesktopApp.cfg
drwxr-xr-x   3 kimi  admin       96 Mar 23 14:34 META-INF/
-rw-r--r--   1 kimi  admin     1522 Mar 23 14:34 MainKt$main$1$1$1$1$1$1.class
-rw-r--r--   1 kimi  admin     9533 Mar 23 14:34 MainKt$main$1$1$1$1$2$1.class
-rw-r--r--   1 kimi  admin    15698 Mar 23 14:34 MainKt$main$1$1$1$1.class
-rw-r--r--   1 kimi  admin     9692 Mar 23 14:34 MainKt$main$1$1.class
-rw-r--r--   1 kimi  admin     2157 Mar 23 14:34 MainKt$main$1.class
-rw-r--r--   1 kimi  admin     1292 Mar 23 14:34 MainKt.class
-rw-r--r--   1 kimi  admin   208635 Mar 23 14:34 animation-core-desktop-0.2.0-build132.jar
-rw-r--r--   1 kimi  admin   201364 Mar 23 14:34 animation-desktop-0.2.0-build132.jar
-rw-r--r--   1 kimi  admin    17536 Mar 23 14:34 annotations-13.0.jar
-rw-r--r--   1 kimi  admin    15414 Mar 23 14:34 desktop-jvm-0.2.0-build132.jar
drwxr-xr-x   4 kimi  admin      128 Mar 23 14:34 drawable/
-rw-r--r--   1 kimi  admin   822462 Mar 23 14:34 foundation-desktop-0.2.0-build132.jar
-rw-r--r--   1 kimi  admin   357370 Mar 23 14:34 foundation-layout-desktop-0.2.0-build132.jar
-rw-r--r--   1 kimi  admin  1488745 Mar 23 14:34 kotlin-stdlib-1.4.20.jar
-rw-r--r--   1 kimi  admin   191485 Mar 23 14:34 kotlin-stdlib-common-1.4.20.jar
-rw-r--r--   1 kimi  admin    22355 Mar 23 14:34 kotlin-stdlib-jdk7-1.4.20.jar
-rw-r--r--   1 kimi  admin    16233 Mar 23 14:34 kotlin-stdlib-jdk8-1.4.20.jar
-rw-r--r--   1 kimi  admin   196243 Mar 23 14:34 kotlinx-collections-immutable-jvm-0.3.jar
-rw-r--r--   1 kimi  admin  1672388 Mar 23 14:34 kotlinx-coroutines-core-jvm-1.4.1.jar
-rw-r--r--   1 kimi  admin    10884 Mar 23 14:34 kotlinx-coroutines-swing-1.4.1.jar
-rw-r--r--   1 kimi  admin  1261868 Mar 23 14:34 material-desktop-0.2.0-build132.jar
-rw-r--r--   1 kimi  admin   674505 Mar 23 14:34 material-icons-core-desktop-0.2.0-build132.jar
-rw-r--r--   1 kimi  admin   584609 Mar 23 14:34 runtime-desktop-0.2.0-build132.jar
-rw-r--r--   1 kimi  admin    19435 Mar 23 14:34 runtime-dispatch-desktop-0.2.0-build132.jar
-rw-r--r--   1 kimi  admin    56960 Mar 23 14:34 runtime-saved-instance-state-desktop-0.2.0-build132.jar
-rw-r--r--   1 kimi  admin   248772 Mar 23 14:34 skiko-jvm-0.1.18.jar
-rw-r--r--   1 kimi  admin  8553451 Mar 23 14:34 skiko-jvm-runtime-macos-x64-0.1.18.jar
-rw-r--r--   1 kimi  admin  1378337 Mar 23 14:34 ui-desktop-0.2.0-build132.jar
-rw-r--r--   1 kimi  admin    38650 Mar 23 14:34 ui-geometry-desktop-0.2.0-build132.jar
-rw-r--r--   1 kimi  admin   304483 Mar 23 14:34 ui-graphics-desktop-0.2.0-build132.jar
-rw-r--r--   1 kimi  admin   311880 Mar 23 14:34 ui-text-desktop-0.2.0-build132.jar
-rw-r--r--   1 kimi  admin    81156 Mar 23 14:34 ui-unit-desktop-0.2.0-build132.jar
-rw-r--r--   1 kimi  admin    11744 Mar 23 14:34 ui-util-desktop-0.2.0-build132.jar
It may seems to much, but, remember that this application embeds a Java Runtime and a lot of libraries that make your live easier developing in Kotlin.
In comparison to Electron.js + React.js I believe that the artefact size is similar, but there is a huge improvement in running a Kotlin / JVM app.
-
Getting Started with Flutter for Linux

This post will not cover how to install Flutter on Linux, that can be easily done reading the following official guide. Instead, it will focus on building a Flutter app that runs on (Ubuntu) Linux.
Adding your Linux machine as a device
By default Flutter expects that you connect an Android or iOS device, or even a Chrome web browser to run the app. But in this case we would like to have a full-native Linux experience.
Flutter may report that you don’t have any connected device
$ flutter devices
No devices detected.

Run "flutter emulators" to list and start any available device emulators.
So in order to create and run a Flutter Linux app, not only the application must we created with Linux as a platform, but also we have to tell Flutter to enable Linux Desktop support.
$ flutter config --enable-linux-desktop
Setting "enable-linux-desktop" value to "true".

You may need to restart any open editors for them to read new settings.
If you are using a version of Flutter prior to 2.x, and upgrade is necessary at this point (flutter upgrade). Running Flutter doctor can tell us if there is something missing. A common situation in a fresh installed device may look like
$ flutter doctor
Doctor summary (to see all details, run flutter doctor -v):
[✓] Flutter (Channel beta, 2.0.0, on Linux, locale en_US.UTF-8)
[✓] Android toolchain - develop for Android devices (Android SDK version 30.0.3)
[✓] Chrome - develop for the web
[✗] Linux toolchain - develop for Linux desktop
    ✗ clang++ is required for Linux development.
      It is likely available from your distribution (e.g.: apt install clang), or can be downloaded from https://releases.llvm.org/
    ✗ CMake is required for Linux development.
      It is likely available from your distribution (e.g.: apt install cmake), or can be downloaded from https://cmake.org/download/
    ✗ ninja is required for Linux development.
      It is likely available from your distribution (e.g.: apt install ninja-build), or can be downloaded from https://github.com/ninja-build/ninja/releases
    ✗ GTK 3.0 development libraries are required for Linux development.
      They are likely available from your distribution (e.g.: apt install libgtk-3-dev)
    ✗ The blkid development library is required for Linux development.
      It is likely available from your distribution (e.g.: apt install libblkid-dev)
    ✗ The lzma development library is required for Linux development.
      It is likely available from your distribution (e.g.: apt install liblzma-dev)
[✓] Android Studio
[✓] IntelliJ IDEA Ultimate Edition (version 2020.3)
[✓] Connected device (2 available)

! Doctor found issues in 1 category.
Install all the necessary dependencies until Flutter doctor returns an output with all items checked, like this
$ flutter doctor
Doctor summary (to see all details, run flutter doctor -v):
[✓] Flutter (Channel beta, 2.0.0, on Linux, locale en_US.UTF-8)
[✓] Android toolchain - develop for Android devices (Android SDK version 30.0.3)
[✓] Chrome - develop for the web
[✓] Linux toolchain - develop for Linux desktop
[✓] Android Studio
[✓] IntelliJ IDEA Ultimate Edition (version 2020.3)
[✓] Connected device (2 available)

• No issues found!
Now, with Flutter telling everything is okey, and the linux desktop support enabled, we can query which devices are enabled
$ flutter devices
2 connected devices:

Linux (desktop) • linux  • linux-x64      • Linux
Chrome (web)    • chrome • web-javascript • Google Chrome 88.0.4324.182
Creating the app
By default Flutter creates an app with several targets as default: iOS, Android, Windows, Linux, macOS and Web. In this brief tutorial, we will only create an app with Linux as the unique target.
$ flutter create --platforms=linux --template=app hello_linuxFlutter create can receive a list of platforms when creating an app, in this example only Linux will be created.
Using the template argument, we can create applications, modules, a Dart package, or a plugin (iOS and/or Android).
Running the application can be doing using flutter run command from the application’s directory. We can specify the target device, using the device-id argument as follows
$ flutter run -d linux
The output of the command above is especially important in order to archive an agile development. It contains not only the URL of the debugger, but also some shortcuts that let’s you use Hot Reload and Hot Restart on this native app.
$ flutter run -d linux
Launching lib/main.dart on Linux in debug mode...
Building Linux application...

** (hello_linux:23299): WARNING **: 17:23:44.883: Failed to set up Flutter locales
Syncing files to device Linux...                                    62ms

Flutter run key commands.
r Hot reload.
R Hot restart.
h Repeat this help message.
d Detach (terminate "flutter run" but leave application running).
c Clear the screen
q Quit (terminate the application on the device).
An Observatory debugger and profiler on Linux is available at: http://127.0.0.1:45697/9m8BapQhQeM=/

Flutter DevTools, a Flutter debugger and profiler, on Linux is available at: http://127.0.0.1:9102?uri=http%3A%2F%2F127.0.0.1%3A45697%2F9m8BapQhQeM%3D%2F
Development Environment
A recommend configuration for a Linux App Development is using Visual Studio Code with the Flutter plugin. On Ubuntu that can be installed using Snap.
$ snap install --classic code
$ code --install-extension dart-code.flutter
Bonus Track
Null Safety
When nullable safety is enabled types cannot be null be default. We have to explicitly say that they can be null.
The first benefit is that it prevents Null Pointer Exceptions (NPE) by throwing errors at compile-time instead of runtime. This is a huge improvement not only in stability but also in code quality.
For learning more about how Dart implements null safety, take a look at this post.
Null safety means that variables can’t contain
nullunless you say they canEnabling null safety is done using dart migrate.
$ dart migrate --apply-changes -
Scanning your Java/Kotlin project with SonarQube

In the past year as a Technical Leader at Santander I have seen several a lot of code challenges submitted by applicants. All of them were small apps with one explicit requirement. Submit an app that makes you are comfortable to put in production.
Most of these apps where written in Java, others in Node.js and a few in Kotlin. And most (if not all) of them, shared a single missing point. Static Code Analysis.
Submit an app that makes you comfortable to put in production.
Static Code Analysis
So what is Static Code Analysis and why it’s important for production-ready software development.
Static Code Analysis, a.k.a. Source Code Analysis, is a type of analysis that addresses weaknesses that may lead to vulnerabilities. It automates a task that can be done in a deep code review, but also allows a much richer analysis. For example, duplicate code detection, coverage and quality of unit tests, bad practices, known vulnerabilities, etc.
There is such thing as Dynamic Code Analysis, in contrast to Static, and the main different is when this analysis is done. Is Dynamic the analysis is done after the program runs (during testing, for example) and in Static it is done before (unit testing and source code).
The best thing about Static Code Analysis is that it’s super easy to integrate in your development processes, either in a CI (Continuous Delivery) or a Git Hook (pre-push, for example).
Straight to the point
We will see in this post how to add a Maven task for a Java project, and do some Static Code Analysis using SonarQube Community Edition. No fancy hardware is needed, no cloud computing or VPS, just your machine which should be able to run SonarQube locally using Docker.
Adding SonarQube to a Maven project
First of all we will add the Jacoco and Sonar plugins to the project’s pom.xml.
<plugin>
    <groupId>org.sonarsource.scanner.maven</groupId>
    <artifactId>sonar-maven-plugin</artifactId>
    <version>3.8.0.2131</version>
</plugin>
<plugin>
    <groupId>org.jacoco</groupId>
    <artifactId>jacoco-maven-plugin</artifactId>
    <version>0.8.6</version>
</plugin>
Also, we will add Maven Compiler Plugin (if it’s not already present)
<plugin>
    <groupId>org.apache.maven.plugins</groupId>
    <artifactId>maven-compiler-plugin</artifactId>
    <version>3.8.1</version>
</plugin>
At the project’s level we will add a profile.
<profiles>
    <profile>
        <id>coverage</id>
        <activation>
            <activeByDefault>true</activeByDefault>
        </activation>
        <build>
            <plugins>
                <plugin>
                    <groupId>org.jacoco</groupId>
                    <artifactId>jacoco-maven-plugin</artifactId>
                    <executions>
                        <execution>
                            <id>prepare-agent</id>
                            <goals>
                                <goal>prepare-agent</goal>
                            </goals>
                        </execution>
                        <execution>
                            <id>report</id>
                            <goals>
                                <goal>report</goal>
                            </goals>
                        </execution>
                    </executions>
                </plugin>
            </plugins>
        </build>
    </profile>
</profiles>
Starting SonarQube
SonarQube will perform static code analysis based on some output files that Maven will produce when running a specific task, but prior to that, we need a working SonarQube Server.
Fortunately, that can be done easily using Docker. In case you don’t have Docker installed in your machine, follow this guide if you are under Linux, or this one if you are on Windows or macOS.
Then pull the latest SonarQube image, and bind the internal port 9000 to your local machine port 9000.
docker run -d --name sonarqube -e SONAR_ES_BOOTSTRAP_CHECKS_DISABLE=true -p 9000:9000 sonarqube:latestOnce it completes successfully, open your browser and login into http://localhost:9090 with the default credentials:
- login: admin
- password: admin
Create a new application and register for a Project ID and a Project Token. For more information about this, check this quick guide.
Putting all together
Once your application is created in SonarQube dashboard, and you have a valid token, run the following maven task.
mvn clean verify sonar:sonar
  -Dsonar.projectKey=<ProjectID> \
  -Dsonar.host.url=http://localhost:9000 \
  -Dsonar.login=<ProjectToken>
Where <ProjectID> and <ProjectToken> where just created. When the target finished executing, you will see the link to your project’s report on the output.
ANALYSIS SUCCESSFUL, you can browse http://localhost:9000/dashboard?id=com.projectYou will see in your project’s dashboard information about your code quality similar to the one in the following screenshots.


-
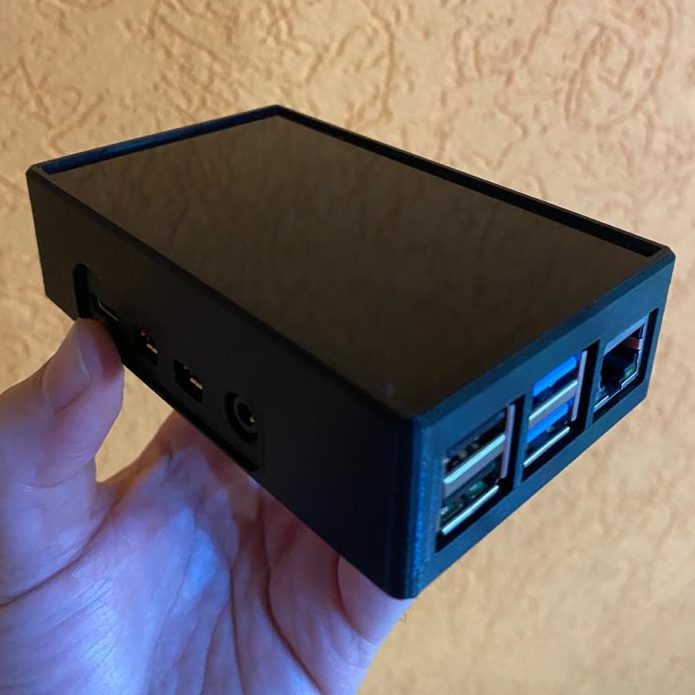
Headless Raspberry Pi configuration
Settings up a Raspberry Pi it’s easy when you have an HDMI display, a USB keyboard and mouse in oder to access the terminal or you favourite Desktop, but can be quite a challenge when you don’t have any of these or at least no keyboard.
Everything in this blog post should be done from you host computer, with you microSD card connected and mounted, assuming the microSD is mounted at /Volumes/boot.
cd /Volumes/boot
Raspberry Pi 4 with Hyperpixel 4.0 display Enable SSH over LAN / WiFi
The SSH server is not enable by default as a user it’s expected that you access your Raspberry using a KVM. Not a Linux Kernel but a Keyboard, (VGA) Display and Mouse. This can be easily done by creating an empty file named ssh.
touch sshPreconfigured a WiFi network
If you are going to connect to Raspberry to your network using an Ethernet cable, you can skip this part. But if a WiFi network (even your mobile phone as a hotspot) it’s you only option, you can set your default WiFi network config in a file called wpa_supplicant.conf
sudo vi wpa_supplicant.confnetwork={ ssid="<< your WiFi's SSID >>" psk="<< your WiFi's password >>" }Take into consideration that this configuration uses your password in plain-text! If you want to encrypt your password in this configuration file do the following:
wpa_passphrase "<< your WiFi's SSID >>" "<< your WiFi's password >>"On a Linux distribution wpa_passphrase is installed, but on macOS or Windows not. the following Ruby script will use OpenSSL in order to create the content of the configuration file.
vi /tmp/raspi_wifi.rbrequire 'openssl' ssid = '<< your WiFi SSID >>' psk = 'ID >>" "<< your WiFi password >>' puts 'country=AR' puts 'ctrl_interface=DIR=/var/run/wpa_supplicant GROUP=netdev' puts 'update_config=1' puts '' puts 'network={' puts ' ssid="' + ssid + '"' puts ' psk=' + OpenSSL::PKCS5.pbkdf2_hmac_sha1(psk, ssid, 4096, 32).unpack("H*").first puts ' key_mgmt=WPA-PSK' puts '}'Then run the script and copy the output to /Volumes/boot/etc/wpa_supplicant/wpa_supplicant.conf
ruby /tmp/raspi_wifi.rb > /Volumes/boot/wpa_supplicant.confAccessing your Pi using SSH
Now when your Raspberry completes its boot process, you will be able to access your device using SSH even without knowing its IP address.
Raspberry exposes a host in your local domain, so the following command with let you know it IP address.
ping raspberrypi.localThe default Raspberry user and password are pi and raspberry, so the following command will establish a SSH connection
ssh pi@raspberry.local -
Getting Started with CircuitPython

CircuitPython is a spin-off of the well-known MicroPython. An efficient implementation of Python 3, with a small subset of the Python Stdlib, optimised for microcontrollers (Cortex-based MCU, for example).
Even thought Python 3 is a powerful language, this implementation fits in 256KB of Flash and uses around 16KB of RAM. So it is suitable for the majority of the mid-range ARM-based microcontrollers.
The main difference between MicroPython and CircuitPython, is that the latest is sponsored and maintained by Adafruit. One of the global leaders developing boards and add-ons for microcontrollers’ enthusiasts. Apart from that:
- It’s based on MicroPython (stable) releases, and not the master branch.
- It’s implementation is focus on Adafruit products (basically Atmel’s M0, M4 devices and ESP8266).
- Floats and Doubles are enabled by default.
- USB is natively supported on all boards (with capable hardware).
- Does not support concurrency.
CircuitPython comes pre-installed on many Adafruit boards, but if it’s not present, or you have moved away from it (going to Arduino), you can always installed a CircuitPython (or MicroPython) bootloader that can be downloaded from:
- CircuitPython Download Page
- MicroPython Download Page
Take into consideration that there are specific builds for each kind of board / CPU. Moreover, some Adafruit libraries, are not supported on MicroPython, for example the Bus Device library.
The Integrated Development Environment
CircuitPython (and MicroPython too) comes with an integrated REPL (Read-Eval-Print-Loop) that can be accessed using the built-in USB-Serial port present in all devices. But, some of this microcontrollers present a USB Drive where we can download Python (and other kind of) files, so the board can used them.
Adafruit recommends using the Mu Editor, but I find it very limited and mainly oriented to beginners when it comes to programming languages. Most of use (developers) use Visual Studio code, and more sophisticated IDEs, with features like:
- Integrated version control (Git)
- Autocomplete
- Linters
- Automatic code formatter
- Included Markdown editor / preview for documentation
That’s why using an IDE like Visual Studio Code makes more sense when writing an advanced application. An extension for VS Code can be found on its MarketPlace. It’s compatible with CircuitPython latests stable release (5.3.x), it’s Open Source, but it has a few issues.

Visual Studio Code with CircuitPython extension demonstrating demo autocomplete feature. 
Board selection in Visual Studio Code with CircuitPython extension. Feel free to start coding with Mu if you want to start with a more stable IDE, which also was design specifically for CircuitPython.

Mu Editor (with Dark mode). 
Mu Editor has different modes based on the target platform. Libraries and Examples
Take into consideration downloading and installing Adafruit’s CircuitPython libraries, which can be fount at https://circuitpython.org/libraries. Also, it’s always a good idea to start looking at some examples in order to get familiar with it. A bundle with a lot of examples can be download from https://github.com/adafruit/Adafruit_CircuitPython_Bundle.
Keeping Circuit Python library up-to-date
CircUp is a dependency management tool for CircuitPython developed by Adafruit. It has a very simple CLI that let’s you list, install, remove and even update, any dependency needed inside your device.
Moreover, the version of each installed library is saved in a requirements.txt file in the working directory, so it’s really simple to keep dependencies organised and versiones on Git.
Installation is done using pip, either directly or using virtualenv. Python 3.5 or higher is requiered.
pip3 install --user circupUsage: circup [OPTIONS] COMMAND [ARGS]... A tool to manage and update libraries on a CircuitPython device. Options: --verbose Comprehensive logging is sent to stdout. --version Show the version and exit. --help Show this message and exit. Commands: freeze Output details of all the modules found on the connected... install Install a named module onto the device. list Lists all out of date modules found on the connected... show Show a list of available modules in the bundle. uninstall Uninstall a named module(s) from the connected device. update Update modules on the device. Use --all to automatically update all modules. -
ESP32: Using the Internal Flash File System
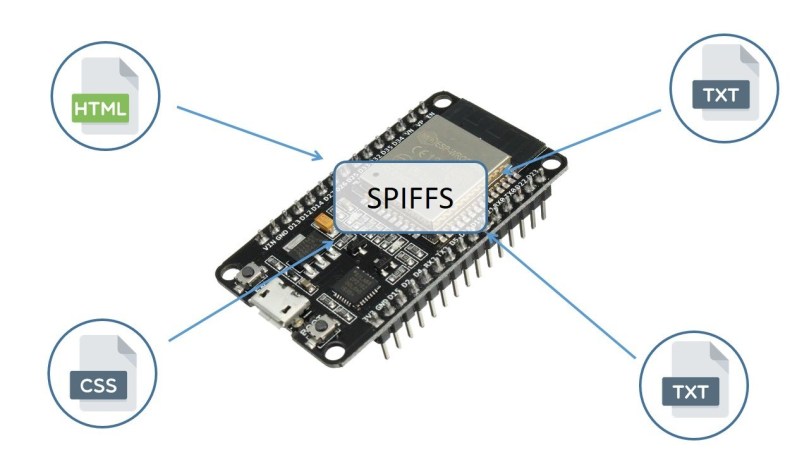
The ESP32 contains a lightweight filesystem specially design for microcontrollers called Serial Peripheral Interface Flash File System. This File System, also known as SPIFFS for its initials, is implemented on top of a Flash chip connected directly to the SPI bus.
SPIFFS supports basic operations on files, like opening, close, read and write, and a very rudimentary implementation of directories. You will find that several project uses this File System in order to serve pages (and files) in a Web Server.
Requirements
First of all we need to install a few dependencies. The most important is the File System uploader tool, which can be used from the Arduino IDE, Visual Studio Code, or command line. The steps for performing this installation can be found at project repository on GitHub.
If you are using Visual Studio Code, as I do, install the following extension: ESP8266FS. From the command line:
code --install-extension vscode-esp8266fsDo not forget to install Arduino-ESP32 Core https://github.com/espressif/arduino-esp32#installation-instructions
Project configuration
When using the Arduino IDE, just selecting the board in the Board Manager will do the job. But when using Visual Studio Code, we have to set some values on .vscode/arduino.json.
{
    "sketch": "main.ino",
    "board": "esp32:esp32:featheresp32",
    "configuration": "FlashFreq=80m,UploadSpeed=921600,DebugLevel=none,PartitionScheme=default,FlashSize=4MB,FlashMode=keep",
    "port": "/dev/tty.SLAB_USBtoUART",
    "output": "output"
}
With this configuration 1M of Flash will be used for SPIFFS and the rest (3M out of 4M) for your code.
Testing the plugin configuration
In Arduino IDE using the Data Uploader is straightforward. But on Visual Studio Code the plugin should be configured carefully in order to work. The following is my Visual Studio Code configuration (settings.json) which is quite verbose for testing purposes.
{
   ...
    "esp8266fs.espota.debug": true,
    "esp8266fs.esptool.executable": "/Users/kimi/Documents/Arduino/hardware/espressif/esp32/tools/esptool.py",
    "esp8266fs.esptool.verbosity": "vvv",
    "esp8266fs.logLevel": "debug",
    "esp8266fs.mkspiffs.executable": "/Users/kimi/Documents/Arduino/hardware/espressif/esp32/tools/mkspiffs/mkspiffs",
    "esp8266fs.preferencesPath": "/Users/kimi/Library/Arduino15",
    "esp8266fs.arduinoUserPath": "/Users/kimi/Documents/Arduino",
    "esp8266fs.spiffsImage": "./spiffs.image",
    "esptool.py.spi_connection": "SPI",
    "esptool.py.compress": "true",
    "esptool.py.verify": "false",
   ...
}
ESP32 has not been installed correctly
Testing the Data Upload can be done by List SPIFFS command. cmd + shift P and select ESP8266FS: List SPIFFS. If you get an error saying
ESP32 has not been installed correctly – see https://github.com/espressif/arduino-esp32
Take into consideration that the Path of the ESP32 Tool is generated by splitting the Board key on .vscode/arduino.json in order to get three parameters: Package, Architecture and Board (ref: https://github.com/kash4kev/vscode-esp8266fs/…/esp8266fs.js#L467).
As my board is an Adafruit HUZZAH32, and my board config is
{
   ...
   "board": "esp32:esp32:featheresp32",
   ...
}
the three key parameters will be:
{
   "package": "esp32",
   "architecture": "esp32",
   "board": "featheresp32",
}
This parameters will be used by the ESP8266FS plugin to create the path where ESP tools are installed. In my setup it will result in /Users/kimi/Documents/Arduino/hardware/esp32/esp32. But, based on the ESP32 Arduino core tutorial, my hardware definition is installed on /Users/kimi/Documents/Arduino/hardware/espressif/esp32.
My workaround to this issue was to create a symbolic link so the esp32 directory was points to espressif.
ln -s espressif esp32Couldn’t find match for argument
Another common error is Couldn’t find match for argument when running mkspiffs, which is a tool found in the ESP32 Arduino Core SDK that handles the creation, upload and download (among other responsibilities) of images.
This issue is already reported on GitHub at https://github.com/kash4kev/vscode-esp8266fs/issues/15. The workaround as explain there, is to disable the configuration esp8266fs.mkspiffs.allFiles.
Packing information into an Image
In your project directory, next to your main Arduino file, create a directory called data. All files stored in that folder will be transfer to your ESP32 microcontroller when uploading the File System.
All our data files are not transferred one by one to the ESP32, but inside an Image. In order to create that image we should pack those files using mkspiffs. The ESP8266FS extension has a command for doing that, but be can also use the command line tool.
The benefits of using the command line tool are clear, the operation can be automated inside a script.
/<Path To Arduino>/hardware/espressif/esp32/tools/mkspiffs/mkspiffs --create /<Your Arduino Project Directory>/data --size 0x30000 --page 256 --block 4096 /<Your Arduino Project Directory>/spiffs.imageUploading files
Remember that uploading files from your Computer will replace the files present in your ESP32.
You will also find a handy command in the Visual Studio Code extension for uploading your currently created image. But if you want to do that using the command line, the following execution will do the trick.
/<Path To Arduino>/hardware/espressif/esp32/tools/esptool/esptool -vvv -ca 0x3D0000 -cd -cp /dev/tty.SLAB_USBtoUART -cb 921600 -cf /<Your Arduino Project Directory>/spiffs.imageWhere /dev/tty.SLAB_USBtoUART is the USB Serial port where I have my ESP32 connected. The result of running this command may look like
--- Uploading SPIFFS file with esptool.py ---
Python Executable: "python"
SPIFFS Uploading Image... (/Users/kimi/Works/eaceto.dev/embedded/ESP32/P1/spiffs.image)
  [SPIFFS] Python   : python
  [SPIFFS] EspTool  : /Users/kimi/Documents/Arduino/hardware/espressif/esp32/tools/esptool.py
  [SPIFFS] address  : 0x290000
  [SPIFFS] port     : /dev/tty.SLAB_USBtoUART
  [SPIFFS] speed    : 921600
  [SPIFFS] before   : default_reset
  [SPIFFS] after    : hard_reset
  [SPIFFS] flashMode: keep
  [SPIFFS] flashFreq: 80m
  [SPIFFS] flashSize: 4MB
Running: python /Users/kimi/Documents/Arduino/hardware/espressif/esp32/tools/esptool.py --chip esp32 --baud 921600 --port /dev/tty.SLAB_USBtoUART --before default_reset --after hard_reset write_flash --flash_mode keep --flash_freq 80m --flash_size 4MB 0x290000 /Users/kimi/Works/eaceto.dev/embedded/ESP32/P1/spiffs.image
esptool.py v2.8
Serial port /dev/tty.SLAB_USBtoUART
Connecting....
Chip is ESP32D0WDQ6 (revision 1)
Features: WiFi, BT, Dual Core, Coding Scheme None
Crystal is 40MHz
MAC: 24:0a:c4:0c:94:78
Uploading stub...
Running stub...
Stub running...
Changing baud rate to 921600
Changed.
Configuring flash size...
Compressed 196608 bytes to 537...
Writing at 0x00290000... (100 %)
Wrote 196608 bytes (537 compressed) at 0x00290000 in 0.0 seconds (effective 136297.5 kbit/s)...
Hash of data verified.
Leaving...
Hard resetting via RTS pin...
ESP8266 SPIFFS interface finished.
Verifying what it’s inside an image
If you want to check which files are included in an image file, you can list them by running
<Path To Arduino>/hardware/espressif/esp32/tools/mkspiffs/mkspiffs --list --page 256 --block 4096 <Path to>/spiffs.imageDownloading an image form the ESP32 to your Computer
May be one of the most important steps when writing an image to the ESP32 is verifying that it was correctly done. For doing this you have to find how many bytes where written the uploading the image to the ESP32. This information can be found on the output of the write_flash operation. And as important as how many it is, where. This information it is also present in the same debug output.
In my previous example this two values where 196608 bytes and starting address 0x290000. So the command to execute in order to read that segment of Flash is:
<Path To Arduino>/hardware/espressif/esp32/tools/esptool.py --chip esp32 --baud 921600 --port /dev/tty.SLAB_USBtoUART read_flash 0x290000 196608 downloaded.imageOutput
iFi, BT, Dual Core, Coding Scheme None
Crystal is 40MHz
MAC: 24:0a:c4:0c:94:78
Uploading stub...
Running stub...
Stub running...
Changing baud rate to 921600
Changed.
196608 (100 %)
196608 (100 %)
Read 196608 bytes at 0x290000 in 2.5 seconds (641.6 kbit/s)...
Hard resetting via RTS pin...
Using the command explained in Verifying what’s inside the image we can see which files are inside the image
<Path To Arduino>/hardware/esp32/esp32/tools/mkspiffs/mkspiffs --list --page 256 --block 4096 downloaded.imageOutput
159 /config_test.json
Next steps…
In the following post I will show how to read a JSON file and obtain a configuration parameter that will be use to configure the WiFi network to which our ESP32 will be connected.
Stay tuned!
-
Rollback from MicroPython to Arduino on ESP32
I hope you find MicroPython is VERY useful and perfect for you. But just in case it doesn’t, or for any reason you want to rollback to Arduino. Here is how to do it.
Requisites
ESPTool (already installed if you went from Arduino to MicroPython)
pip3 install esptoolIf there is a permissions problem doing this, try to run pip3 install either by using “sudo” or “–user” flag.
Steps
The following example assumes the USB port can be found at /dev/cu.SLAB_USBtoUART, but you may find it at /dev/ttyUSB0
- Erase your ESP32 Flash.
$ esptool.py --port /dev/cu.SLAB_USBtoUART erase_flash
esptool.py v2.8
Serial port /dev/cu.SLAB_USBtoUART
Connecting........__
Detecting chip type... ESP32
Chip is ESP32D0WDQ6 (revision 1)
Features: WiFi, BT, Dual Core, Coding Scheme None
Crystal is 40MHz
MAC: 24:0a:c4:0c:94:78
Uploading stub...
Running stub...
Stub running...
Erasing flash (this may take a while)...
Chip erase completed successfully in 4.1s
Hard resetting via RTS pin...
2. Thanks it! You can now go back to Arduino IDE and build and run programs on your ESP32 board!
Another useful ESPTool’s sub command
ESPTool let us retrieve the MAC address of the device from our host. This can be used for several things, like for example creating specific setup files. In order to read the ESP32 MAC address, run ESPTool with the subcommand “read_mac” as shown below
$ esptool.py --port /dev/cu.SLAB_USBtoUART read_mac esptool.py v2.8 Serial port /dev/cu.SLAB_USBtoUART Connecting........__ Detecting chip type... ESP32 Chip is ESP32D0WDQ6 (revision 1) Features: WiFi, BT, Dual Core, Coding Scheme None Crystal is 40MHz MAC: 24:0a:c4:9d:24:28 Uploading stub... Running stub... Stub running... MAC: 24:0a:c4:9d:24:28 Hard resetting via RTS pin... -
MicroPython on an ESP32
Requirements
Software on the host
ESPTools and Adafruit AMPY are required. Both can be installed using pip3. The recommended version of Python on the host is Python 3.7
pip3 install esptool --upgrade
pip3 install adafruit-ampy --upgrade
Firmware for the ESP32 module
MicroPython for ESP32. The latests firmware (compatible with ESP-IDF v4.x) when writing can be found at http://micropython.org/resources/firmware/esp32-idf4-20191220-v1.12.bin
Installation
First of all erase your ESP32 completely by running the following command. Where /dev/ttyUSB0 is the Virtual COM port created by your board.
$ esptool.py --chip esp32 -p /dev/ttyUSB0 erase_flash
esptool.py v2.8
Serial port /dev/ttyUSB0
Connecting....
Chip is ESP32D0WDQ6 (revision 1)
Features: WiFi, BT, Dual Core, Coding Scheme None
Crystal is 40MHz
MAC: 24:0a:c4:0c:94:78
Uploading stub...
Running stub...
Stub running...
Erasing flash (this may take a while)...
Chip erase completed successfully in 1.8s
Hard resetting via RTS pin...
Then, write the flash with the download image (esp32-idf4-20191220-v1.12.bin is this example).
$ esptool.py --chip esp32 -p /dev/ttyUSB0 write_flash -z 0x1000 esp32-idf4-20191220-v1.12.bin
esptool.py v2.8
Serial port /dev/ttyUSB0
Connecting....
Chip is ESP32D0WDQ6 (revision 1)
Features: WiFi, BT, Dual Core, Coding Scheme None
Crystal is 40MHz
MAC: 24:0a:c4:0c:94:78
Uploading stub...
Running stub...
Stub running...
Configuring flash size...
Auto-detected Flash size: 4MB
Compressed 1408512 bytes to 894711...
Wrote 1408512 bytes (894711 compressed) at 0x00001000 in 78.9 seconds (effective 142.9 kbit/s)...
Hash of data verified.
Leaving...
Hard resetting via RTS pin...
Testing
After successfully flashing your ESP32 module, connect it to a Serial Monitor at 115200 baud. I like to use the embedded serial monitor that Arduino IDE has.
Perform a hard reset and you should see a console output like the one below:
rst:0x1 (POWERON_RESET),boot:0x13 (SPI_FAST_FLASH_BOOT)
flash read err, 1000
Falling back to built-in command interpreter.
OK
>ets Jun  8 2016 00:22:57
rst:0x10 (RTCWDT_RTC_RESET),boot:0x13 (SPI_FAST_FLASH_BOOT)
configsip: 0, SPIWP:0xee
clk_drv:0x00,q_drv:0x00,d_drv:0x00,cs0_drv:0x00,hd_drv:0x00,wp_drv:0x00
mode:DIO, clock div:2
load:0x3fff0018,len:4
load:0x3fff001c,len:4988
load:0x40078000,len:10404
load:0x40080400,len:5680
entry 0x400806bc
 [0;32mI (519) cpu_start: Pro cpu up. [0m
 [0;32mI (519) cpu_start: Application information: [0m
 [0;32mI (519) cpu_start: Compile time:     Dec 20 2019 07:56:38 [0m
 [0;32mI (523) cpu_start: ELF file SHA256:  0000000000000000... [0m
 [0;32mI (529) cpu_start: ESP-IDF:          v4.0-beta1 [0m
 [0;32mI (534) cpu_start: Starting app cpu, entry point is 0x40083014 [0m
 [0;32mI (0) cpu_start: App cpu up. [0m
 [0;32mI (544) heap_init: Initializing. RAM available for dynamic allocation: [0m
 [0;32mI (551) heap_init: At 3FFAFF10 len 000000F0 (0 KiB): DRAM [0m
 [0;32mI (557) heap_init: At 3FFB6388 len 00001C78 (7 KiB): DRAM [0m
 [0;32mI (563) heap_init: At 3FFB9A20 len 00004108 (16 KiB): DRAM [0m
 [0;32mI (569) heap_init: At 3FFBDB5C len 00000004 (0 KiB): DRAM [0m
 [0;32mI (575) heap_init: At 3FFCC8A0 len 00013760 (77 KiB): DRAM [0m
 [0;32mI (582) heap_init: At 3FFE0440 len 00003AE0 (14 KiB): D/IRAM [0m
 [0;32mI (588) heap_init: At 3FFE4350 len 0001BCB0 (111 KiB): D/IRAM [0m
 [0;32mI (594) heap_init: At 40099FB8 len 00006048 (24 KiB): IRAM [0m
 [0;32mI (601) cpu_start: Pro cpu start user code [0m
 [0;32mI (619) spi_flash: detected chip: generic [0m
 [0;32mI (619) spi_flash: flash io: dio [0m
 [0;32mI (620) cpu_start: Chip Revision: 1 [0m
 [0;33mW (621) cpu_start: Chip revision is higher than the one configured in menuconfig. Suggest to upgrade it. [0m
 [0;32mI (632) cpu_start: Starting scheduler on PRO CPU. [0m
 [0;32mI (0) cpu_start: Starting scheduler on APP CPU. [0m
MicroPython v1.12 on 2019-12-20; ESP32 module with ESP32
Type "help()" for more information.
>>>
Integrated Development Environment
Any Python IDE may be useful for programming in MicroPython (or CircuitPython if you are using an Adafruit compatible board). I personally recommend using Mu (https://codewith.mu/). Mu is programmed in Python, so it works on Windows, Linux and macOS. It also has a portable (pen drive friendly version) which it makes it ideal for students that uses university computers.

Select ESP MicroPython. This preference can be changed later. Testing the module can be done using the Python REPL that be have already flashed. For example, importing the machine package can give us access to getting and settings properties of our board. For example, the Huzzah32 (ESP32) board runs at 240MHz, but when flashing MicroPython the clock is set at 160Mhz. That can be check running:
MicroPython v1.12 on 2019-12-20; ESP32 module with ESP32
Type "help()" for more information.
>>> import machine
>>> machine.freq()
160000000
>>>
Increasing the CPU frequency back to 240MHz can be done calling the same function as shown below:
>>> machine.freq(240000000) # set frequency back to 240MHz I (1604452) pm_esp32: Frequency switching config: CPU_MAX: 240, APB_MAX: 240, APB_MIN: 240, Light sleep: DISABLED >>> machine.freq() 240000000 >>> -
Setting up ESP32 development environment in Linux (with Arduino IDE)
Installing the IDE

Download Arduino IDE from https://www.arduino.cc/en/Main/Software. The latest version when writing this a article is 1.8.12 (https://www.arduino.cc/download_handler.php?f=/arduino-1.8.12-linux64.tar.xz).
Extract the content of the tar.xz file where you want to have your Arduino IDE, and then, execute install.sh. If there is an error, like:
$ ./install.sh
Adding desktop shortcut, menu item and file associations for Arduino IDE...
ln: failed to create symbolic link '/usr/local/bin/arduino': Permission denied
Adding s
try to re run the script as root
$ sudo ./install.shInstalling the USB drivers
There are mainly two types of USB chips that may be used as Serial to USB converters, one from FTDI and the other one from SiLabs. In order to find out which chip your ESP32 board has, disconnect the board from your PC and run lsusb.
$ lsusb
Bus 002 Device 002: ID 0bda:0411 Realtek Semiconductor Corp. 4-Port USB 3.0 Hub
Bus 002 Device 001: ID 1d6b:0003 Linux Foundation 3.0 root hub
Bus 001 Device 002: ID 046d:c534 Logitech, Inc. Unifying Receiver
Bus 001 Device 010: ID 0bda:5411 Realtek Semiconductor Corp. 4-Port USB 2.0 Hub
Bus 001 Device 004: ID 8087:0aaa Intel Corp.
Bus 001 Device 003: ID 048d:8297 Integrated Technology Express, Inc. ITE Device(8595)
Bus 001 Device 001: ID 1d6b:0002 Linux Foundation 2.0 root hub
Then, connect the board and repeat the command.
$ lsusb
Bus 002 Device 002: ID 0bda:0411 Realtek Semiconductor Corp. 4-Port USB 3.0 Hub
Bus 002 Device 001: ID 1d6b:0003 Linux Foundation 3.0 root hub
Bus 001 Device 002: ID 046d:c534 Logitech, Inc. Unifying Receiver
Bus 001 Device 012: ID 10c4:ea60 Cygnal Integrated Products, Inc. CP2102/CP2109 UART Bridge Controller [CP210x family]
Bus 001 Device 010: ID 0bda:5411 Realtek Semiconductor Corp. 4-Port USB 2.0 Hub
Bus 001 Device 004: ID 8087:0aaa Intel Corp.
Bus 001 Device 003: ID 048d:8297 Integrated Technology Express, Inc. ITE Device(8595)
Bus 001 Device 001: ID 1d6b:0002 Linux Foundation 2.0 root hub
The new device, in this case a CP210x (Cygnal Integrated CP2102 / CP2109 UART Bridge Controller [CP210x family], is your ESP32 board.
Bus 001 Device 012: ID 10c4:ea60 Cygnal Integrated Products, Inc. CP2102/CP2109 UART Bridge Controller [CP210x family]Install USB driver for your board.
- If the chip is a SiLabs CP210x refer to https://www.silabs.com/products/development-tools/software/usb-to-uart-bridge-vcp-drivers
- If the chip is a FTDI refer to https://www.ftdichip.com/FTDrivers.htm (may already be included in your Linux distribution
Adding ESP32 Boards to Arduino IDE
Arduino IDE does not support ESP32 boards (and many other 3rd party boards) by default. But adding an additional board to Arduino IDE, in this case, an ESP32 board is as easy as:
- Start Arduino IDE and open Preferences window
- In Additional Board Manager URLs, add the following link:
https://raw.githubusercontent.com/espressif/arduino-esp32/gh-pages/package_esp32_index.json- You can add several board definitions, separating URLs with comma
- Open Boards Manager from Tools; Boards; and install the ESP32 platform.
- After installation, select your ESP32 board from Tools; Board menu.


-
Subscribe
Subscribed
Already have a WordPress.com account? Log in now.
